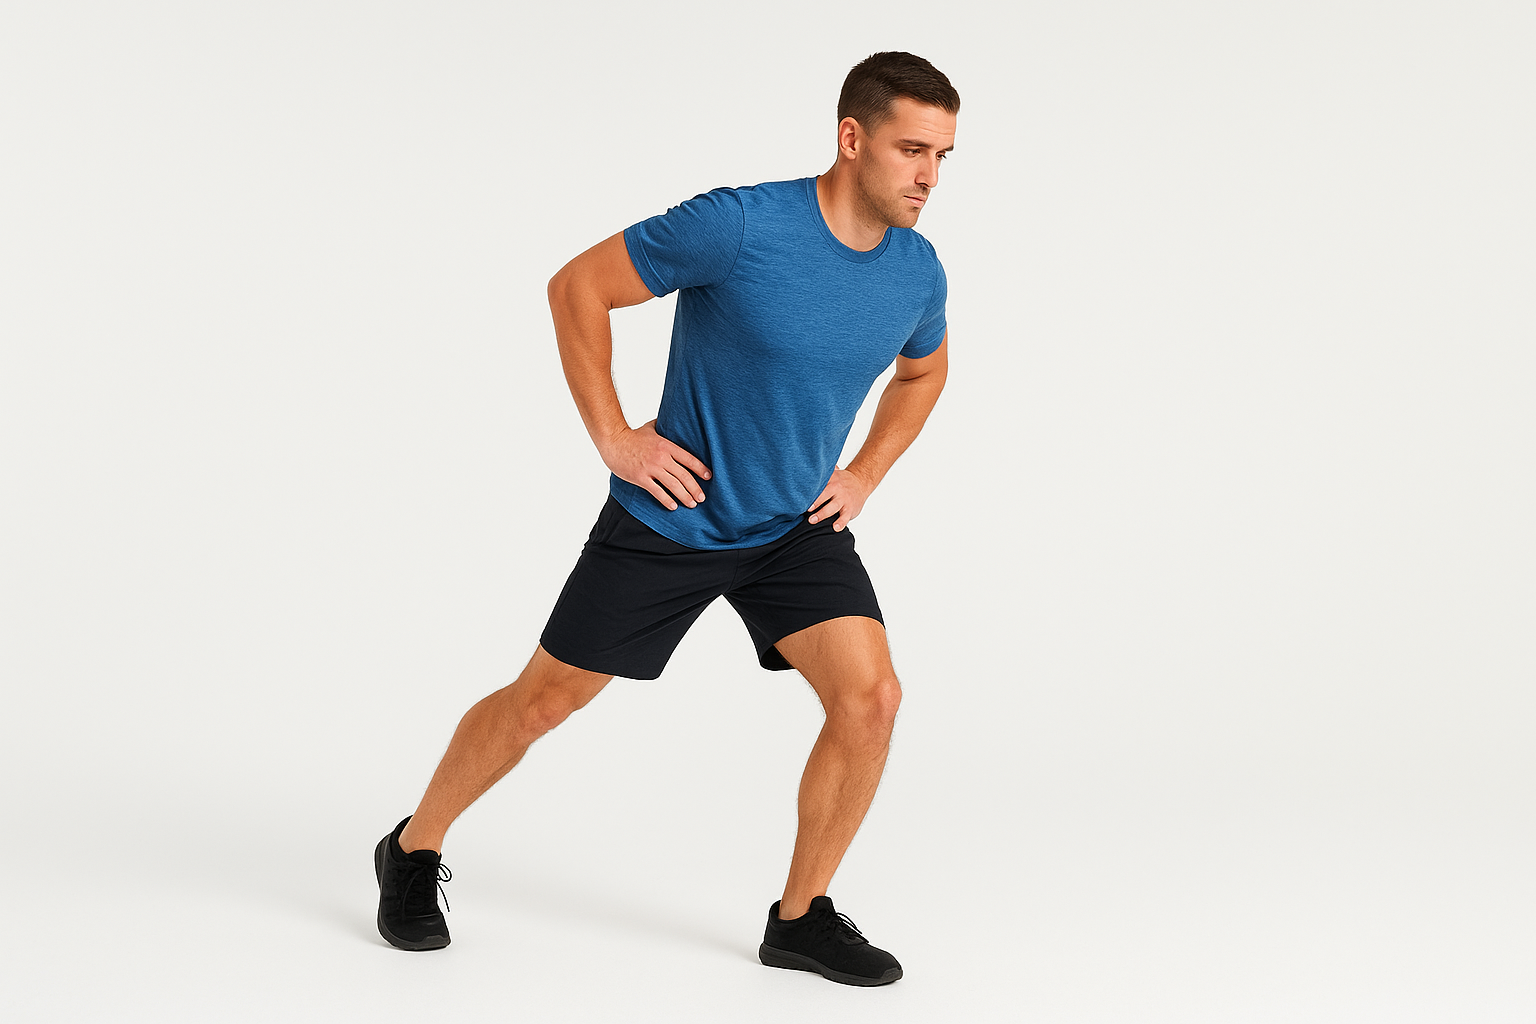
Ankle sprains rank among the most common musculoskeletal injuries, and here’s what makes them frustrating: once you’ve sprained an ankle, your chances of doing it again increase significantly. The ligaments stretch, proprioception diminishes, and without targeted work, that ankle stays vulnerable. The solution isn’t rest alone, it’s rebuilding what the injury took from you. That’s where ankle sprain prevention exercises come in.
At Achilles Foot and Ankle Center, our podiatrists treat ankle injuries daily across our Central Virginia clinics. We’ve watched patients break the cycle of repeated sprains through dedicated strengthening and balance work. Whether you’re recovering from a recent injury, dealing with chronic ankle instability, or simply want to protect yourself before problems start, the exercises ahead can help.
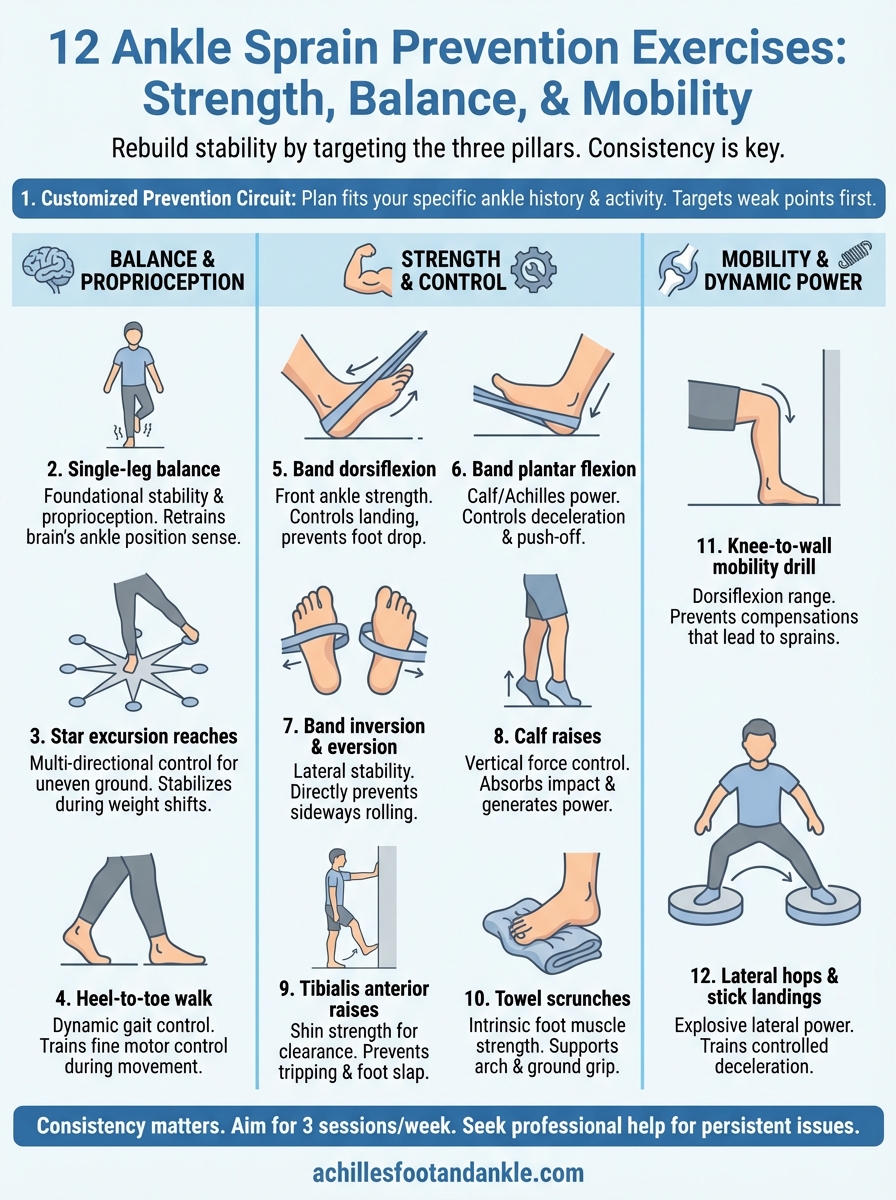
This guide covers 12 exercises that target the three pillars of ankle stability: strength, flexibility, and proprioception (your body’s sense of joint position). Most require little to no equipment, and you can do them at home. We’ll walk through proper form for each movement and explain why it matters for your ankles specifically. By the end, you’ll have a practical routine you can start today.
1. Build a customized prevention circuit
Before you dive into individual exercises, you need a plan that fits your specific ankle history and activity level. A customized circuit groups the most effective ankle sprain prevention exercises into a routine you’ll actually follow. This approach beats random exercise selection because it addresses your weak points first, then builds comprehensive stability across all ankle motions.
Why a customized plan prevents repeat sprains
Generic ankle programs treat every sprain the same, but your injury pattern tells a specific story. Someone who rolls their ankle inward during basketball needs different emphasis than a runner who landed awkwardly on a trail root. A customized plan targets the exact movements that failed you during your injury, strengthening ligaments and muscles in those vulnerable positions. Research consistently shows that tailored programs reduce re-injury rates far more effectively than one-size-fits-all protocols.
Your ankle also has a memory problem after a sprain. The proprioceptive sensors in your ligaments get damaged, leaving your brain with delayed or inaccurate position feedback. This lag means you can’t react fast enough when your foot hits uneven ground. A proper circuit retrains this neuromuscular timing through progressive balance and stability drills that mirror real-world challenges.
"Customized prevention programs address both the mechanical weakness and the neurological deficits that keep ankles vulnerable after injury."
What a podiatrist looks for in an ankle risk check
During an ankle evaluation, podiatrists assess range of motion in all directions, checking for limitations that signal compensations or incomplete healing. We test dorsiflexion (bringing toes toward shin), plantar flexion (pointing foot down), inversion (sole facing inward), and eversion (sole facing outward). Restricted motion in any plane increases sprain risk because your ankle can’t absorb force properly.
Balance testing reveals proprioception gaps. You’ll stand on one leg with eyes open, then closed, while your doctor watches for excessive wobbling or inability to hold position for 30 seconds. We also check strength in specific muscle groups, particularly the peroneals on your ankle’s outside and the tibialis anterior in front. Weakness here means other structures compensate, setting up future injury.
How to structure your weekly circuit at home or the gym
Start with three sessions per week on non-consecutive days to allow recovery between workouts. Each session should take 20 to 30 minutes and include five to six exercises from the categories below: balance work, resistance training, and mobility drills. Begin every circuit with a five-minute warmup of ankle circles and light calf stretches.
Your first month focuses on controlled movements and proper form. Prioritize slower repetitions over speed or load. After four weeks, add progressive challenges like unstable surfaces, increased resistance, or plyometric elements based on your goals. Athletes returning to sport need sport-specific movements added by week six.
When to book an ankle evaluation at Achilles Foot and Ankle Center
Schedule an evaluation if you’ve sprained your ankle in the past six months or if you notice frequent rolling, giving way, or pain during activity. Persistent swelling, clicking sensations, or difficulty balancing on one foot also warrant professional assessment. Our Central Virginia clinics offer same-day appointments when you need urgent guidance.
Book a visit before starting any prevention program if you have chronic ankle instability, defined as multiple sprains or constant feelings of instability. We’ll identify structural issues, create your customized circuit, and determine whether you need additional interventions like bracing or physical therapy referrals.
2. Single-leg balance
Single-leg balance forms the foundation of effective ankle sprain prevention exercises because it forces your ankle to stabilize your entire body weight without help from the other leg. This simple drill rebuilds the proprioceptive pathways your sprain damaged, teaching your brain to track ankle position in real time. You’ll use this exercise as your baseline test throughout recovery, measuring progress by how long you can hold steady.

What it trains for sprain prevention
Standing on one leg activates the small stabilizing muscles around your ankle that larger movements miss. Your peroneals, tibialis posterior, and intrinsic foot muscles fire constantly to make micro-adjustments, strengthening the exact support system that prevents rolling. This drill also retrains neuromuscular reaction time, so your ankle responds faster when you step on uneven ground or land awkwardly.
Balance work addresses the sensory deficit that persists after ligament damage. Your ankle’s mechanoreceptors send position signals to your brain, but injury disrupts this feedback loop. Single-leg standing forces these sensors to recalibrate, restoring the ankle awareness you need for confident movement.
How to do it with perfect form
Stand near a wall or counter for safety, then lift one foot completely off the ground. Keep your standing knee slightly bent, not locked, and your hip level without hiking one side up. Hold your lifted foot in front of your body, not behind, to avoid leaning backward. Start with your eyes open and aim for 30 seconds of stillness.
Focus your gaze on a fixed point at eye level to help maintain balance. Distribute weight evenly across your standing foot, not just on the ball or heel. Your ankle will make small corrections, which is normal and desired.
Progressions that make it harder without jumping
After mastering 30 seconds with eyes open, close your eyes to remove visual cues and force greater reliance on ankle proprioception. Progress to standing on a folded towel or foam pad to create instability. Advanced versions include adding arm movements, head turns, or catching and tossing a small ball.
Mistakes that make you wobble or cheat
Gripping your toes creates false stability that doesn’t transfer to real movement. Keep toes relaxed and spread naturally. Locking your knee shifts balance work to your hip instead of your ankle. Touching down with your lifted foot, even briefly, resets the proprioceptive challenge and reduces training benefit.
"Single-leg balance is the most efficient way to retrain the sensory feedback your ankle lost during injury."
3. Star excursion reaches
Star excursion reaches combine balance training with controlled movement in multiple directions, simulating the ankle challenges you face when walking on uneven terrain or changing direction quickly. This exercise ranks among the most functional ankle sprain prevention exercises because it forces your ankle to stabilize while your body weight shifts through eight different reach patterns. You’ll build strength and coordination that directly transfers to real-world movements where sprains typically happen.
What it trains for uneven ground and quick cuts
This drill strengthens your ankle’s ability to maintain stability during dynamic weight shifts, exactly what happens when you step on a rock, pivot on a playing field, or catch yourself from stumbling. Each reach direction challenges different muscle groups around your ankle, creating comprehensive stability that static balance work misses. The forward reaches activate your tibialis anterior and dorsiflexors, while backward reaches engage your calf complex and peroneals.
Your proprioceptive system learns to track limb position through space while your ankle supports you, building the awareness that prevents rolling. Athletes benefit particularly because the movement patterns mirror cutting, planting, and deceleration motions common in sports.
How to set up and perform each reach direction
Stand on your left leg with hands on hips, keeping your standing knee slightly bent throughout. Reach your right leg forward as far as you can while maintaining balance, lightly tap the ground with your toe, then return to start. Repeat reaching in eight directions: forward, forward-right diagonal, right, back-right diagonal, back, back-left diagonal, left, and forward-left diagonal. Complete three sets of five reaches per direction, then switch legs.
Progressions for athletes and return to sport
Progress by increasing reach distance as your control improves. Add a foam pad under your standing foot to create instability. Advanced athletes can hold light dumbbells or reach to specific floor markers that require precise distance control, mimicking sport-specific footwork patterns.
Mistakes that stress the ankle instead of training it
Touching down heavily with your reaching foot removes the balance challenge from your standing ankle. Rotating your torso to extend reach shifts work away from your ankle to your hip and core. Locking your standing knee creates rigid support that doesn’t build the dynamic stability you need.
"Star excursion reaches build the multi-directional ankle control that prevents sprains during unpredictable movements."
4. Heel-to-toe walk
The heel-to-toe walk takes ankle sprain prevention exercises beyond static balance, forcing your ankle to stabilize through continuous weight transfers while you move forward. This drill directly improves your walking gait mechanics, teaching your ankle to control the transition from heel strike to toe-off without wobbling or compensating. You’ll build the dynamic stability needed for confident movement on crowded sidewalks, uneven paths, or any situation where precise foot placement matters.
What it trains for gait control and stability
Walking heel-to-toe activates your ankle’s fine motor control systems in ways regular walking doesn’t challenge. Your proprioceptors must process position changes constantly as your body weight rolls from heel to toe, strengthening the neuromuscular pathways that keep you upright during normal gait. This narrow base of support forces your peroneals and tibialis posterior to fire continuously, building endurance in the muscles that prevent rolling.
How to do it safely in a hallway
Start at one end of a clear hallway or walkway, placing your right heel directly in front of your left toes with no gap between them. Walk forward in this tight heel-to-toe pattern for 10 to 20 steps, keeping your arms relaxed at your sides or held out slightly for balance. Maintain an upright posture without looking down at your feet. Use a wall for fingertip support initially if needed, then progress to walking without assistance.
"Heel-to-toe walking retrains the ankle control patterns your brain relies on during every step you take."
Progressions for better challenge and carryover
Progress by walking with your eyes closed for the final five steps, forcing greater reliance on proprioception. Try walking backward in heel-to-toe fashion, which demands even more ankle precision and control. Advanced versions include walking along a straight line taped to the floor or performing the movement on a foam balance pad.
Mistakes that reduce the balance benefit
Leaving gaps between your heel and toes removes the narrow base challenge that trains your ankle. Looking down at your feet shifts balance control to your visual system instead of ankle proprioception. Taking faster steps creates momentum that masks poor control, reducing the stability benefit you need.
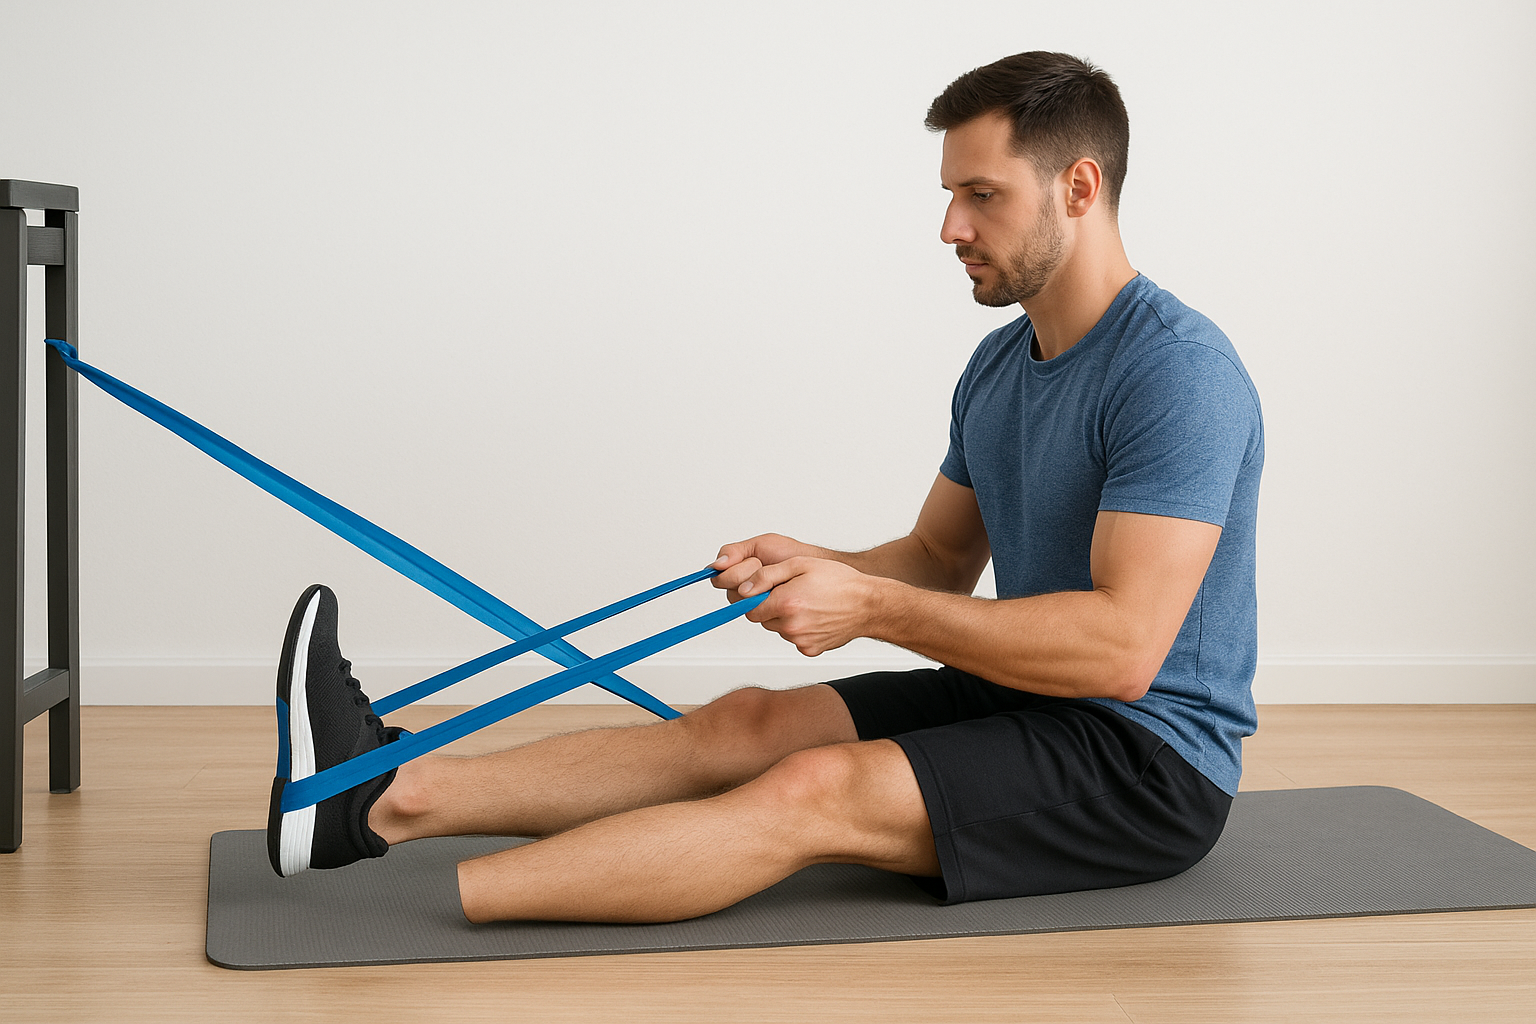
5. Resistance band dorsiflexion
Resistance band dorsiflexion targets the muscles on the front of your ankle and shin, an area often overlooked in ankle sprain prevention exercises but critical for controlling how your foot lands and lifts during movement. This exercise strengthens your tibialis anterior and toe extensors, the muscles that pull your foot upward and prevent your toes from dragging or slapping the ground. Building strength here reduces your sprain risk because these muscles control the deceleration phase when your foot contacts the ground, absorbing force that might otherwise roll your ankle.
What it trains in the front of the ankle and shin
Dorsiflexion work strengthens your tibialis anterior muscle, which runs along your shin bone and lifts your foot toward your knee. This muscle acts as a primary brake during landing, controlling how quickly your foot hits the ground after your heel strikes. Weak dorsiflexors force your ankle to absorb impact without proper muscular support, increasing rolling risk. You also train the extensor digitorum longus, which lifts your toes and helps clear obstacles during the swing phase of walking.
How to set up the band and control the motion
Sit on the floor with your legs extended straight in front of you, then loop a resistance band around the ball of your foot with the other end anchored to a stable object at floor level. Point your foot away from you to create tension, then pull your toes back toward your shin against the band’s resistance. Hold for two seconds at the top, then lower with control. Complete three sets of 15 repetitions per foot, keeping your heel planted on the ground throughout the movement.
"Dorsiflexion strength determines how well your ankle controls impact forces during every step you take."
Progressions for strength and endurance
Progress by using a thicker resistance band or doubling the band to increase load. Add isometric holds at the top position, working up to 10-second holds between repetitions. Endurance athletes benefit from higher repetition sets of 25 to 30 reps with lighter resistance.
Mistakes that shift work to the knee or hip
Bending your knee during the pull removes tension from your ankle and transfers work to your hip flexors. Lifting your heel off the ground turns the movement into a leg raise instead of isolated ankle work. Pulling too fast prevents your dorsiflexor muscles from controlling the entire range of motion.
6. Resistance band plantar flexion
Resistance band plantar flexion builds strength in your calf muscles and Achilles tendon, the powerhouse complex that propels you forward with every step and controls your landing during jumps and running. This exercise complements dorsiflexion work by targeting the posterior chain of your ankle, creating balanced strength that prevents compensations and overuse injuries. Strong plantar flexors give your ankle the muscular support it needs to absorb force without relying solely on ligaments, making this one of the essential ankle sprain prevention exercises for active individuals.
What it trains in the calf and Achilles complex
Plantar flexion strengthens your gastrocnemius and soleus muscles, which make up your calf and attach to your heel through the Achilles tendon. These muscles control the eccentric lowering phase when your heel contacts the ground, absorbing impact that might otherwise force your ankle into a vulnerable position. You also train the smaller stabilizers like the flexor hallucis longus and tibialis posterior, which support your arch and prevent inward rolling during push-off.
How to do it without cramping or pointing toes
Sit with your legs extended and loop the resistance band around the ball of your foot, holding both ends with your hands. Pull your toes back toward your shin to create starting tension, then push your foot away from you by pointing your toes downward against the band’s resistance. Focus on smooth movement through your entire ankle, not just curling your toes. Complete three sets of 15 repetitions per foot, pausing for one second at peak contraction.
"Plantar flexion strength protects your Achilles tendon and gives your ankle the power to control landings safely."
Progressions for stronger push-off
Progress by increasing band thickness or doubling the band to add resistance. Perform single-leg standing calf raises between band sets to build functional strength under load. Athletes can add tempo variations, taking three seconds to lower and one second to push, maximizing time under tension.
Mistakes that overload the forefoot
Curling your toes instead of moving through your ankle shifts work to small foot muscles that fatigue quickly without building calf strength. Releasing tension at the bottom of each rep removes the eccentric loading benefit your Achilles needs. Rocking your body forward creates momentum that replaces true ankle work.
7. Resistance band inversion and eversion
Resistance band inversion and eversion work the muscles on the inner and outer edges of your ankle, creating lateral stability that directly prevents the sideways rolling motion responsible for most sprains. These movements train your peroneals on the outside and tibialis posterior on the inside, building the muscular control that keeps your ankle centered when you land on uneven surfaces or change direction suddenly. This exercise belongs in every set of ankle sprain prevention exercises because it targets the exact plane of motion where ligaments get injured most frequently.
What it trains on the inside and outside of the ankle
Eversion strengthens your peroneus longus and brevis muscles, which run down the outside of your leg and pull your foot’s outer edge upward. These muscles act as your primary defense against inversion sprains, the injury that happens when your ankle rolls outward and your foot turns inward. Inversion work targets the tibialis posterior, which supports your arch and prevents your foot from rolling too far inward during push-off or landing.
How to do each direction with slow control
Sit with your leg extended and loop the band around the ball of your foot for inversion work, then anchor the band to a stable object on your foot’s outside edge. Pull your foot inward against resistance, hold for two seconds, and return with control. For eversion, anchor the band on your foot’s inside edge and pull your foot outward. Complete three sets of 15 repetitions per direction on each foot, focusing on isolated ankle motion without letting your knee wobble.
"Controlled inversion and eversion training builds the lateral ankle stability that prevents the most common sprain mechanisms."
Progressions that build sport-ready stability
Progress by using thicker bands or doubling up for greater resistance. Perform the movements while standing on one leg to add a balance component. Athletes can add diagonal pulling angles that combine inversion with plantar flexion or eversion with dorsiflexion, mimicking sport-specific ankle positions.
Mistakes that cause the leg to rotate instead
Rotating your entire leg from the hip removes isolation from your ankle and defeats the exercise’s purpose. Moving too quickly prevents your stabilizing muscles from controlling the full range. Allowing your knee to drift inward or outward during the movement shifts work away from your ankle’s lateral control system.
8. Calf raises
Calf raises build vertical force control in your ankle, training the muscles that absorb impact when you land from a jump and generate power during push-off. This exercise strengthens your gastrocnemius and soleus muscles in a functional movement pattern that directly translates to walking, running, and sports. Unlike isolated band work, calf raises load your ankle with body weight, making them one of the most practical ankle sprain prevention exercises for building real-world stability under natural forces.
What it trains for landing control and push-off
Calf raises develop eccentric strength in your ankle, the type of control you need when landing from a step or absorbing impact during running. Your calf muscles lengthen under tension as you lower your heels, building the deceleration capacity that prevents your ankle from collapsing into a vulnerable position. You also train the concentric phase when lifting onto your toes, strengthening the explosive power your ankle needs for quick direction changes and athletic movements.
How to do two-leg and single-leg versions
Start with two-leg calf raises by standing with your feet hip-width apart near a wall for balance. Rise onto the balls of your feet as high as possible, hold for one second, then lower your heels below your starting level if you’re on a step. Complete three sets of 15 repetitions. Progress to single-leg raises by lifting one foot off the ground and performing the same motion on your standing leg, using fingertip wall support initially.
"Calf raises build the ankle strength needed to control landings and prevent collapse during weight-bearing movements."
Progressions using tempo and range of motion
Progress by slowing your lowering phase to three seconds while maintaining a one-second lift, maximizing time under tension. Perform raises on the edge of a step to increase your range of motion below neutral. Advanced athletes can add weight by holding dumbbells or wearing a loaded backpack.
Mistakes that make you bounce or roll your ankle
Bouncing at the bottom removes the eccentric control benefit your ankle needs for injury prevention. Letting your ankles roll inward or outward creates unwanted lateral stress instead of vertical strength. Rising only partially reduces the full range strengthening that protects your ankle during complete push-off motions.
9. Tibialis anterior raises
Tibialis anterior raises isolate the shin muscle that lifts your foot in a way most ankle sprain prevention exercises overlook, building strength that prevents foot drop and improves your ability to clear obstacles during walking or running. This exercise targets your tibialis anterior through its full range of motion, creating the muscular endurance you need when fatigue sets in during long walks or at the end of athletic events. Strong shin muscles also control how quickly your foot lowers after heel strike, reducing the jarring impact that can force your ankle into a sprain position.
What it trains for deceleration and foot clearance
This movement strengthens your ability to lift your toes and control foot descent, two functions that directly prevent tripping and unstable landings. Your tibialis anterior acts as a shock absorber during the loading phase of each step, controlling the rate at which your foot flattens after your heel contacts the ground. Weakness here causes foot slap, where your forefoot crashes down uncontrolled, creating ankle instability that increases sprain risk.
How to do wall-supported shin raises
Stand with your back against a wall and heels 6 to 8 inches away from the baseboard, keeping your knees straight but not locked. Lift your toes and forefeet as high as possible while your heels stay planted, hold for two seconds, then lower with control. Complete three sets of 15 repetitions, resting 30 seconds between sets. You should feel concentrated effort along your shin, not in your thighs or hips.
Progressions that improve endurance for running
Progress by adding tempo variations with three-second lifts and three-second lowers to increase time under tension. Perform single-leg versions by shifting your weight onto one leg while keeping the other foot lightly touching the ground for balance. Runners benefit from higher repetition sets of 25 to 30 reps that build the endurance needed for sustained activity.
"Tibialis anterior strength determines your foot clearance and landing control during every step you take."
Mistakes that turn it into a hip exercise
Leaning your torso forward shifts work from your shins to your hip flexors, eliminating the ankle benefit. Bending your knees creates momentum that reduces the isolated strength training your tibialis anterior needs. Lifting too quickly prevents your shin muscles from controlling both the concentric and eccentric phases of movement.
10. Towel scrunches
Towel scrunches strengthen the intrinsic foot muscles that support your arch and stabilize your ankle from the ground up, making this one of the most accessible ankle sprain prevention exercises you can do anywhere with just a small towel. This exercise trains the small muscles deep in your foot that larger movements like calf raises can’t reach, building the foundation-level strength that keeps your ankle aligned during weight-bearing activities. You’ll develop the muscular endurance needed to maintain proper foot mechanics when fatigue sets in during long walks, standing work shifts, or athletic events.
What it trains in the arch and small stabilizers
This movement activates your flexor digitorum brevis and abductor hallucis, the small muscles that maintain your arch height and control how your foot distributes pressure across its surface. These stabilizers work constantly during standing and walking to prevent your arch from collapsing inward, a position that puts excessive stress on your ankle’s medial ligaments. Strong intrinsic foot muscles also improve your ability to grip the ground during balance challenges, enhancing the proprioceptive feedback your ankle needs for stability.
How to do it seated and standing
Place a small towel flat on the floor and sit in a chair with your bare foot on the towel’s edge. Use your toes to scrunch the towel toward you, pulling it under your foot in small gathered folds. Continue until you’ve scrunched the entire towel, then smooth it out and repeat. Complete three sets per foot. Progress to standing scrunches by placing your foot on the towel while bearing full body weight, which adds resistance and challenges your balance simultaneously.
"Towel scrunches build the foundational foot strength that supports proper ankle alignment during all weight-bearing activities."
Progressions using time, distance, and load
Progress by placing a light weight on the towel’s far end, forcing your foot muscles to work harder during each scrunch. Add time challenges by seeing how quickly you can gather the entire towel with good form. Advanced versions include performing the movement while standing on one leg or scrunching the towel laterally across your body instead of straight toward you.
Mistakes that grip with the whole leg
Curling your toes without engaging your arch removes the intrinsic muscle activation this exercise targets. Lifting your heel off the ground shifts work to your calf muscles instead of your foot stabilizers. Tensing your entire leg or gripping with your hip creates compensations that bypass the small muscles you’re trying to strengthen.
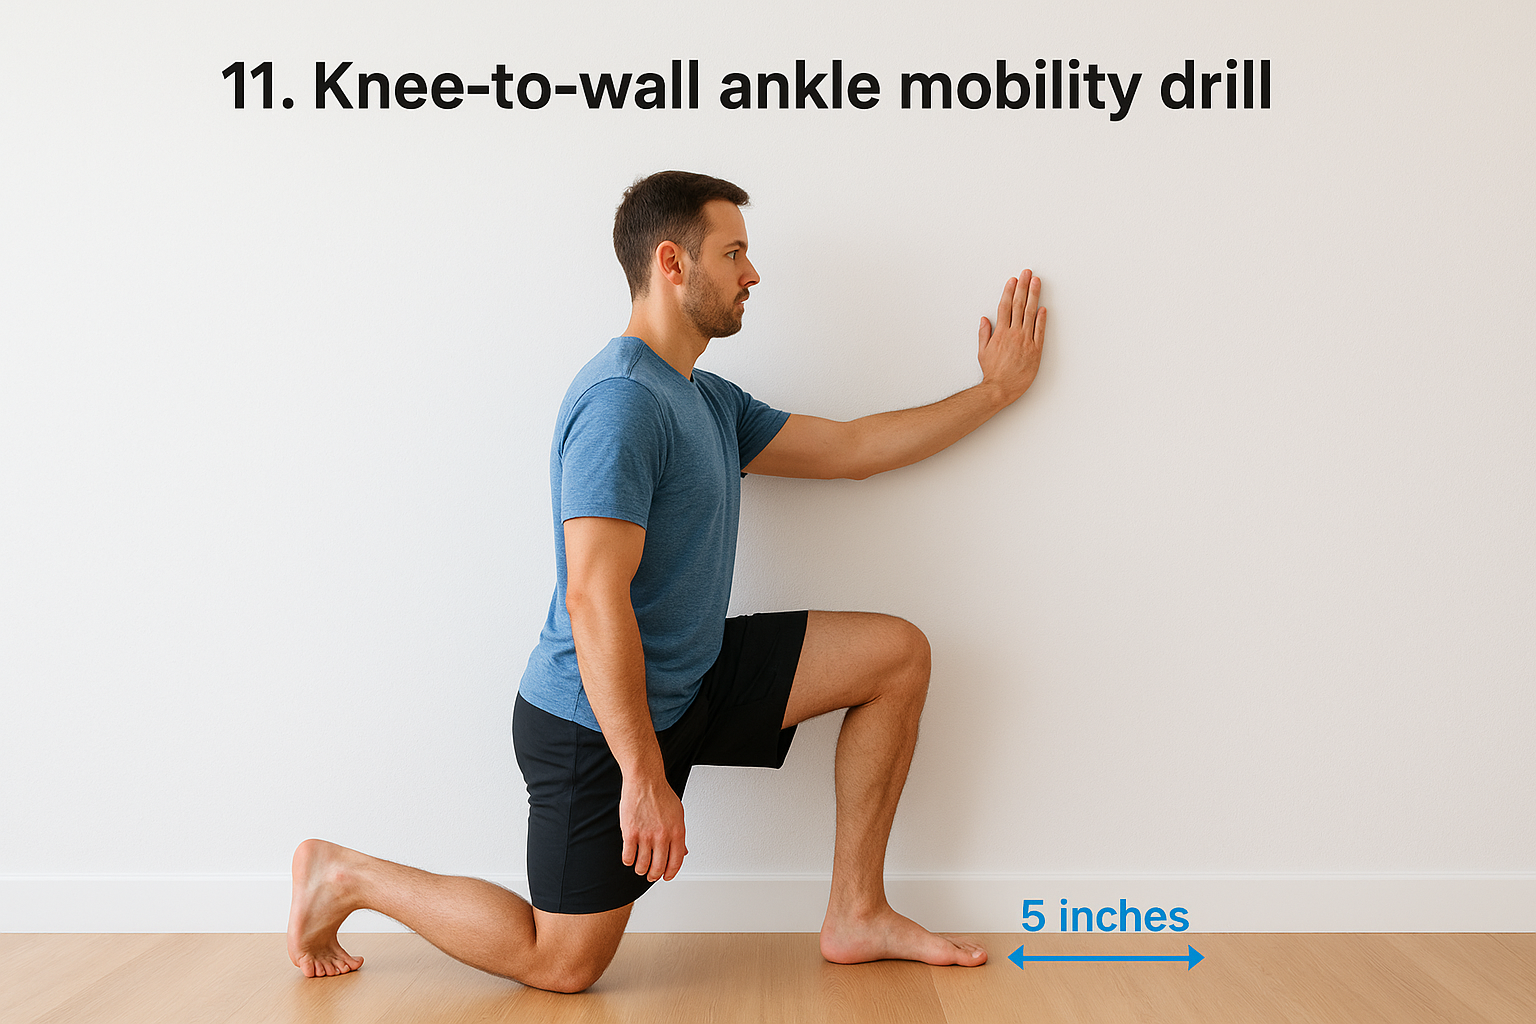
11. Knee-to-wall ankle mobility drill
The knee-to-wall ankle mobility drill measures and improves your dorsiflexion range of motion, the ability to bring your shin forward over your toes while keeping your heel planted. This movement pattern appears in every squat, stair climb, and landing you perform, making adequate dorsiflexion essential for proper ankle mechanics during daily activities. Limited ankle mobility forces your body to compensate by letting your heel lift or your knee cave inward, both positions that increase your sprain risk. This drill belongs in your ankle sprain prevention exercises because it directly addresses the stiffness that keeps your ankle vulnerable during weight-bearing movements.
Why dorsiflexion range of motion matters for sprains
Restricted dorsiflexion creates a mechanical bottleneck that forces compensation patterns throughout your lower body during movement. When your ankle can’t bend forward adequately, your knee travels inward to find the range it needs, placing excessive stress on your ankle’s medial ligaments. This compensatory pattern explains why athletes with limited ankle mobility suffer more frequent sprains even when their strength and balance test well. Adequate dorsiflexion also allows your shin to move forward during the loading phase of walking, helping your ankle absorb impact forces properly instead of transmitting them directly to ligaments.
How to measure and improve mobility safely
Stand facing a wall with your toes 5 inches away from the baseboard, keeping your test foot flat on the ground. Drive your knee forward toward the wall while maintaining heel contact with the floor. If your knee touches the wall without your heel lifting, move your foot back one inch and repeat. Continue until you find the maximum distance where your knee reaches the wall with your heel down. Work to improve this distance by holding the end position for 30 seconds, repeating three times per ankle.
"Adequate dorsiflexion range allows your ankle to absorb forces properly instead of forcing compensations that lead to sprains."
Progressions that translate to squats and stairs
Progress by increasing your starting distance from the wall as your mobility improves, working toward a 5-inch toe-to-wall measurement. Add weight-bearing progressions by performing bodyweight squats with your heels elevated on a small plate, gradually lowering the plate height as your ankle range increases. Stair climbing benefits from practicing controlled descents where you focus on driving your shin forward over your toes during each step down.
Mistakes that let the arch collapse
Allowing your arch to flatten inward removes the dorsiflexion challenge from your ankle and shifts the movement to your midfoot joints. Lifting your heel even slightly invalidates the measurement and prevents true ankle joint mobilization. Rotating your foot outward creates a false sense of range by accessing mobility from your hip instead of your ankle.
12. Lateral hops and stick landings
Lateral hops and stick landings represent the most advanced of the ankle sprain prevention exercises because they combine explosive power with controlled deceleration in the exact movement pattern that causes most athletic sprains. This drill trains your ankle to absorb force during rapid side-to-side movements, building the reactive strength needed when you cut left during basketball, shuffle right to return a tennis serve, or simply step sideways off a curb unexpectedly. The "stick" component teaches your ankle and knee to work together during landing, creating the neuromuscular control that prevents your foot from rolling when you touch down on one leg.
What it trains for sudden direction changes
This exercise develops your reactive stability during lateral movements, the type of ankle control you need during sports and daily activities that involve quick direction changes. Your peroneals and ankle stabilizers must fire instantly to prevent rolling when you land, building the fast-twitch muscle response that protects you during unpredictable movements. You also train your proprioceptive system to process landing forces in milliseconds, creating the automatic corrections that keep your ankle centered before your conscious mind registers the challenge.
How to land quietly with aligned knees and ankles
Start by standing on your left leg, then hop sideways to your right approximately 12 inches, landing on your right foot in a controlled single-leg position. Stick the landing for three seconds without your foot wobbling or your lifted leg touching down. Focus on landing with your knee aligned over your second toe, not caving inward, and your ankle in a neutral position. A quiet landing with minimal ground impact indicates proper force absorption. Complete three sets of eight hops per direction.
"Mastering the stick landing teaches your ankle to absorb lateral forces without rolling, the exact skill that prevents sprains during sports and daily activities."
Progressions for speed, distance, and reactions
Progress by increasing hop distance from 12 inches to 18 or 24 inches as your control improves. Add speed by reducing ground contact time between hops while maintaining stick quality. Athletes benefit from reactive progressions where a partner calls out direction changes mid-hop or uses hand signals that require split-second decisions.
Mistakes that increase rollover risk
Landing with your weight shifted too far forward onto your toes removes ankle stabilizer engagement and increases rolling risk. Letting your knee cave inward creates a collapse pattern that stresses your ankle’s medial structures. Failing to hold the stick position for a full three seconds prevents the static stability training your ankle needs after explosive movement.
Next steps for sprain-proof ankles
You now have 12 targeted ankle sprain prevention exercises that address strength, balance, and mobility in the exact movement patterns your ankle needs to stay stable. Consistency matters more than perfection when you start this routine. Set aside three sessions per week, track your progress with simple metrics like single-leg balance time or hop distance, and adjust the difficulty as your ankle responds.
Your ankle’s stability improves gradually through dedicated work, but some situations require professional guidance. If you experience persistent pain, swelling that won’t resolve, or frequent giving way despite regular exercise, you need a proper evaluation. Our podiatrists at Achilles Foot and Ankle Center assess your specific injury history, identify structural issues that exercises alone can’t fix, and create customized treatment plans that get you back to full function. Schedule a same-day appointment at any of our Central Virginia locations to start your ankle recovery with expert support.