Subtalar joint arthritis can significantly limit a patient’s mobility and quality of life when conservative treatments fail to provide adequate relief. At Achilles Foot and Ankle Center, our surgeons perform subtalar fusion surgical technique procedures regularly at our state-of-the-art Foot and Ankle Surgery Center, the only one of its kind in Central Virginia. This guide breaks down the procedural steps and key considerations that make this arthrodesis effective.
A successful subtalar fusion eliminates painful motion between the talus and calcaneus while preserving overall hindfoot function. The procedure demands precise joint preparation and secure fixation to achieve solid bony union. Whether you’re a surgical trainee reviewing technique or a practicing surgeon refining your approach, understanding each step matters for optimal patient outcomes.
This article walks through the complete surgical process, from patient positioning and incision placement to joint preparation, fixation methods, and closure. We’ll cover both the sinus tarsi and posterior approaches, along with technical pearls that improve fusion rates.
Indications, contraindications, and workup
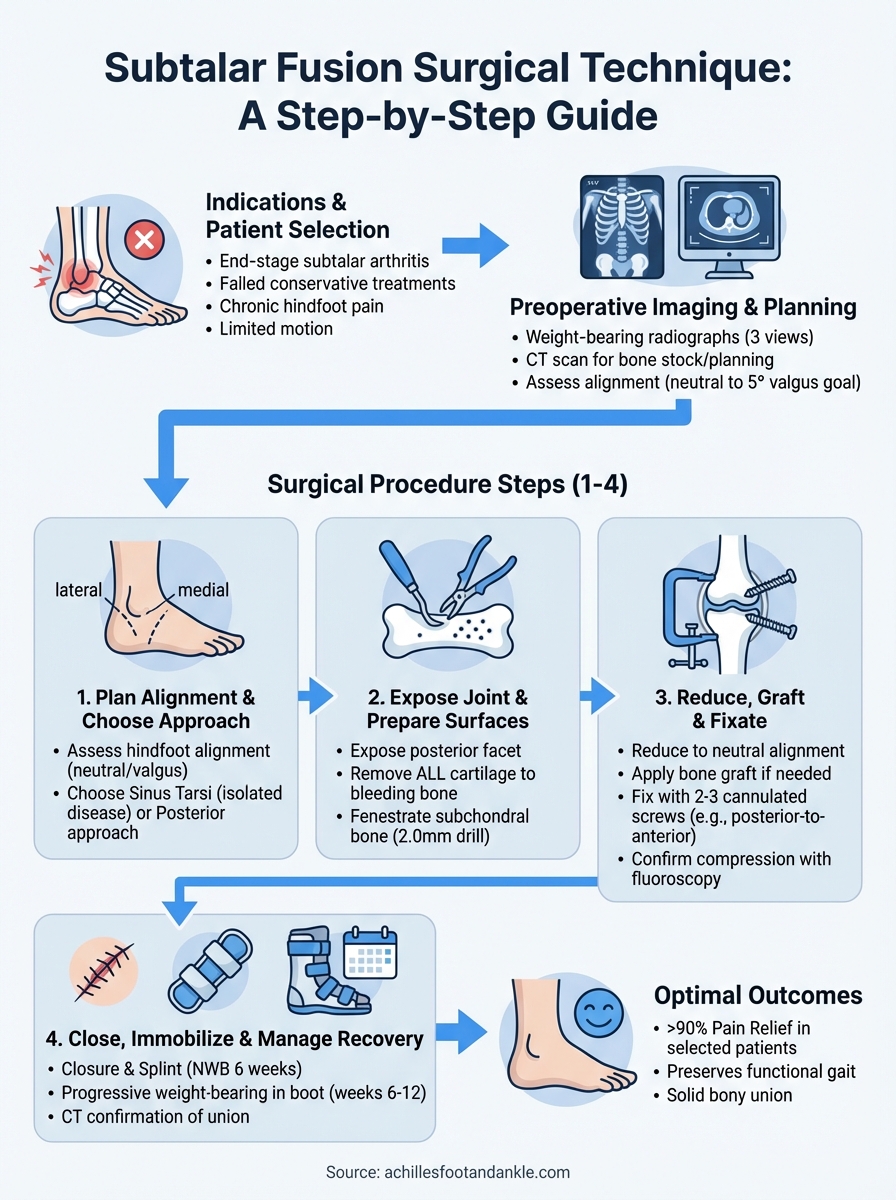
You need to select the right patients before considering subtalar fusion surgical technique as a treatment option. This procedure works best for patients with end-stage subtalar arthritis who have exhausted conservative treatments like physical therapy, orthotics, bracing, and anti-inflammatory medications. The most common indications include post-traumatic arthritis following calcaneal fractures, primary osteoarthritis, inflammatory arthropathies such as rheumatoid arthritis, and coalition resection failures. Patients typically present with chronic hindfoot pain, limited subtalar motion, and difficulty walking on uneven surfaces.
Patient selection criteria
Your ideal candidate demonstrates clear radiographic evidence of joint space narrowing, subchondral sclerosis, or collapse on weight-bearing films. Patients should have isolated subtalar disease rather than pan-talar arthritis, which would require triple arthrodesis instead. You must evaluate their overall health status, including smoking history (which significantly reduces fusion rates), vascular status, and bone quality. Active infection, severe peripheral vascular disease, and Charcot neuroarthropathy represent absolute contraindications that you cannot work around.
Patients with multiple joint involvement or significant deformity may need a modified approach or expanded arthrodesis.
Relative contraindications require careful consideration on your part. These include active smoking (increases nonunion risk threefold), poorly controlled diabetes, significant osteoporosis, and patients with high functional demands who might benefit from ankle replacement instead. Young, active individuals present a challenging decision because fusion eliminates motion permanently.
Preoperative imaging and planning
Order weight-bearing radiographs of the foot and ankle in three views (anteroposterior, lateral, and oblique) to assess joint space and alignment. These films reveal the extent of arthritis and help you identify any concurrent pathology in adjacent joints. CT scans provide superior detail for surgical planning, showing bone stock quality, previous hardware, and the exact location of arthritic changes. This imaging helps you determine whether you can use the sinus tarsi approach or need posterior access for significant deformity correction.
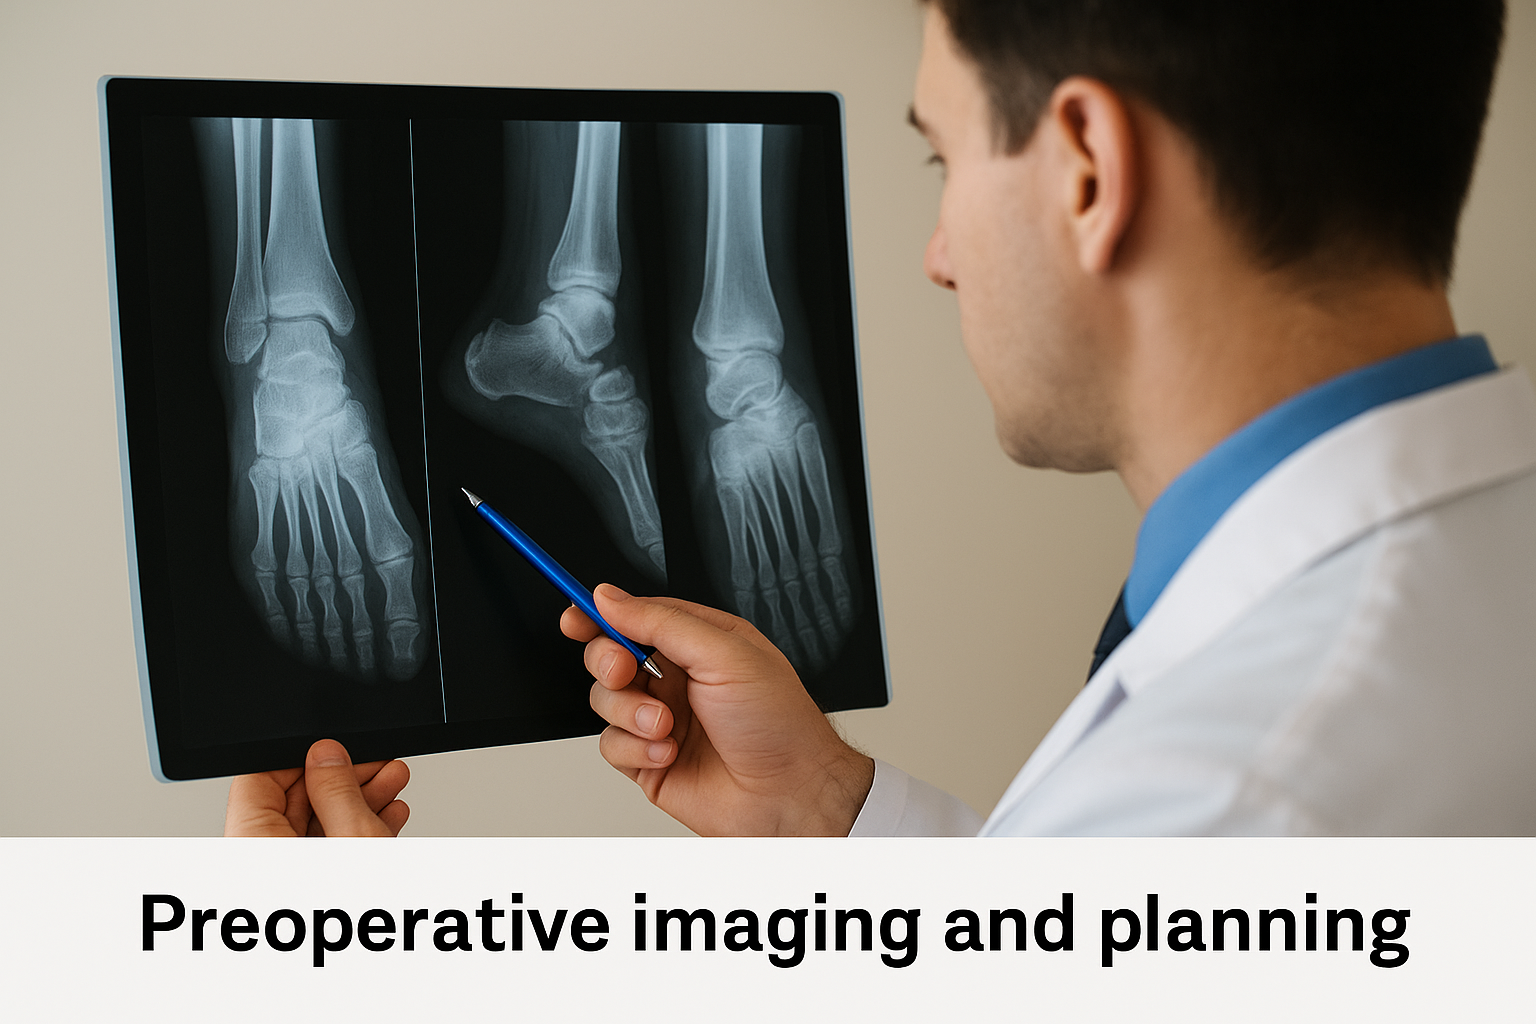
Your workup should include vascular assessment in patients over 50 or those with diabetes. Obtain basic laboratory work including complete blood count and inflammatory markers to rule out infection. Document neurovascular status carefully, noting any tarsal tunnel symptoms or vascular insufficiency that might complicate healing.
Step 1. Plan alignment and choose approach
You must determine the desired hindfoot alignment before making any incisions. Position your patient supine on the operating table with a bump under the ipsilateral hip to internally rotate the leg. Apply a thigh tourniquet (not inflated yet) and prepare the entire lower extremity circumferentially to the knee. This positioning gives you access to both the medial and lateral sides of the hindfoot if needed.
Assess hindfoot alignment
Stand at the foot of the table and evaluate the hindfoot alignment from the posterior view. Measure the amount of varus or valgus deformity present. Your goal typically involves achieving a neutral or slightly valgus (5 degrees) alignment to prevent overload of the lateral column. Mark the mechanical axis from the tibia through the heel to ensure you correct any existing deformity during the fusion. Patients with significant varus often require lateral column lengthening or medial column shortening, while valgus deformities may need the opposite.
Correcting alignment during subtalar fusion surgical technique prevents accelerated arthritis in adjacent joints and improves long-term outcomes.
Select surgical approach
Choose between the sinus tarsi approach and the posterior approach based on your alignment correction needs. Use the sinus tarsi approach (lateral incision over the sinus tarsi) for isolated arthritis without significant deformity. This method provides excellent visualization of the posterior facet with less soft tissue disruption. Reserve the posterior approach (medial incision posterior to the medial malleolus) for severe varus deformities, previous hardware removal needs, or when you need to lengthen the medial column. Some surgeons prefer a combined approach for complex reconstructions.
Step 2. Expose joint and prepare fusion surfaces
Inflate your tourniquet to 250 mmHg (or appropriate pressure based on patient size) once you complete the skin incision. Make your incision along the previously marked line, either through the sinus tarsi or posterior to the medial malleolus depending on your chosen approach. Carry the dissection down through subcutaneous tissue while protecting neurovascular structures. For the sinus tarsi approach, identify and ligate branches of the sinus tarsi artery to control bleeding. Develop the interval between the extensor digitorum brevis origin and the lateral talus to access the joint.
Expose the posterior facet
Carefully remove the fat pad from the sinus tarsi to visualize the posterior facet completely. Use a periosteal elevator to strip soft tissue and remaining cartilage from the joint surfaces. You need clear visualization of both the talar and calcaneal surfaces of the posterior facet. Insert a lamina spreader or small retractor into the joint space to distract the surfaces and improve your working room. This distraction helps you identify the exact joint margins and ensures you prepare the entire articular surface properly.
Remove cartilage and prepare bone
Strip all remaining cartilage down to bleeding subchondral bone using a combination of curettes, osteotomes, and rongeurs. Your goal involves removing the articular surface while preserving bone stock. Create multiple small perforations (fenestrations) in the subchondral bone using a 2.0mm drill bit or small osteotome to encourage bleeding and improve fusion potential. These fenestrations should penetrate approximately 3-4mm into the bone. Shape both surfaces to maximize bone-to-bone contact by contouring them to match each other.
Adequate joint preparation directly determines fusion success in subtalar fusion surgical technique, so take time to achieve complete cartilage removal and optimal bone contact.
Step 3. Reduce, graft as needed, and fixate
Reduce the subtalar joint by positioning the calcaneus directly beneath the talus in neutral alignment. Use a bone reduction clamp or large pointed reduction forceps to hold the joint surfaces together temporarily. Check your alignment from multiple angles using fluoroscopic imaging in lateral, anteroposterior, and Broden views. The lateral view should show parallel joint surfaces with the talar head centered over the navicular, while the Broden views confirm proper posterior facet alignment.
Achieve proper reduction
Verify your hindfoot alignment matches your preoperative plan before placing permanent fixation. Apply gentle compression across the joint using your reduction clamp while maintaining the desired varus or valgus correction. Insert a temporary guidewire across the joint to hold the reduction while you assess position under fluoroscopy. This wire serves as your reference point for final screw placement and prevents loss of reduction during definitive fixation.
Apply bone graft if necessary
Pack cancellous autograft into any gaps between the prepared joint surfaces if you have voids larger than 2-3mm. Harvest this graft from the calcaneus through the same incision or obtain it from the proximal tibia if you need larger volumes. Morselized allograft or bone graft substitute works as an alternative in patients with poor bone quality or when autograft harvest seems risky.
Adequate graft application in subtalar fusion surgical technique significantly improves fusion rates when bone contact appears suboptimal.
Insert fixation hardware
Place your definitive fixation using either two or three large diameter screws (typically 6.5-7.3mm cannulated screws). Insert the first screw from the posterior calcaneus directed anteriorly into the talar body, then add a second screw from the lateral calcaneus into the talar neck. Common configurations include:
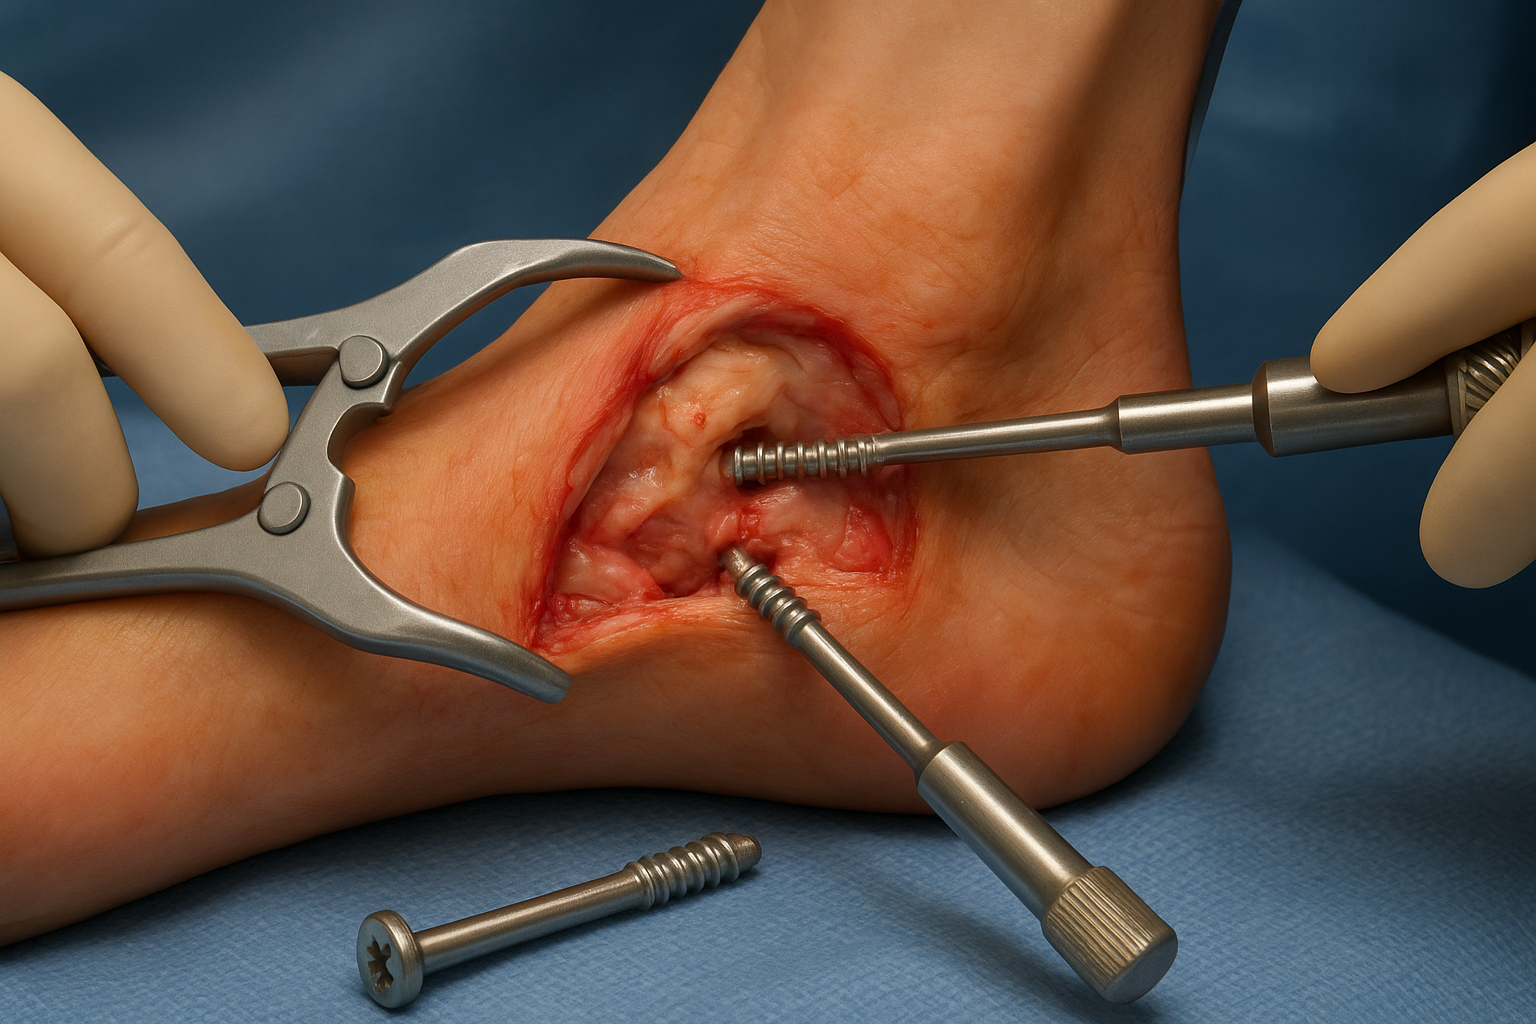
- Two-screw technique: posterior-to-anterior and lateral-to-medial
- Three-screw technique: adds anterior-to-posterior screw from talar neck
- Compression plates: reserved for severe osteoporosis or revision cases
Confirm adequate compression and proper screw position with final fluoroscopic images before releasing your tourniquet.
Step 4. Close, immobilize, and manage recovery
Release your tourniquet and achieve meticulous hemostasis using bipolar cautery on all bleeding vessels. Irrigate the wound thoroughly with sterile saline to remove bone debris and reduce infection risk. Close the deep fascia and subcutaneous layers with absorbable sutures (2-0 or 3-0 Vicryl) to eliminate dead space. Use interrupted or running nylon sutures for skin closure, spacing them approximately 5mm apart for optimal healing.
Apply sterile dressing and splint
Cover the incision with sterile gauze and apply a well-padded posterior splint from toes to just below the knee. Position the ankle at 90 degrees and maintain the corrected hindfoot alignment you achieved during the subtalar fusion surgical technique. Mold the splint carefully around the heel and ankle to prevent rotation while avoiding excessive pressure over bony prominences. This initial splint stays in place for 10-14 days until the first postoperative visit.
Proper initial immobilization prevents loss of alignment and protects the fusion site during the critical early healing phase.
Implement weight-bearing protocol
Keep your patient non-weight-bearing for the first six weeks after surgery. Advance to partial weight-bearing in a walking boot at six weeks if radiographs show early fusion signs. Progress to full weight-bearing at 10-12 weeks once you confirm solid bony union on CT scan. Follow this typical progression:
- Weeks 0-6: Non-weight-bearing in splint, then cast
- Weeks 6-10: Partial weight-bearing in boot
- Weeks 10-12: Full weight-bearing in boot
- Week 12+: Transition to supportive shoes
Order serial radiographs at two-week intervals initially, then monthly until fusion appears complete. Consider CT imaging at three months if plain films remain unclear about union status.
Where to go next
Mastering the subtalar fusion surgical technique requires attention to each procedural step, from initial patient selection through final fixation and postoperative management. Your fusion rates improve dramatically when you achieve complete cartilage removal, maintain proper alignment, and apply adequate compression across prepared bone surfaces. Studies show that successful arthrodesis eliminates subtalar pain in over 90% of properly selected patients while preserving functional gait patterns.
Patients considering subtalar fusion deserve evaluation by experienced foot and ankle specialists who perform this procedure regularly. At Achilles Foot and Ankle Center, our surgeons utilize advanced imaging and surgical techniques at Central Virginia’s only dedicated Foot and Ankle Surgery Center. We offer comprehensive care from initial consultation through complete recovery. Schedule a same-day appointment to discuss whether subtalar arthrodesis represents the right treatment option for your chronic hindfoot pain.