A bone spur on your foot doesn’t always cause problems, until it does. That sharp, stabbing pain under your heel or across the top of your foot can turn every step into a negotiation. While bone spurs themselves won’t dissolve with stretching, the right bone spur foot exercises can reduce the tension, inflammation, and tightness that actually drive most of the pain. The goal isn’t to fix the spur, it’s to change the environment around it so your foot can function without constant discomfort.
At Achilles Foot and Ankle Center, our podiatrists across Central Virginia treat bone spurs regularly, and we’ve seen firsthand how targeted stretching and strengthening make a real difference in daily comfort. Many patients who commit to a simple routine at home experience noticeable improvement, sometimes enough to avoid more invasive treatment altogether.
Below, you’ll find seven exercises we recommend for managing bone spur pain and improving mobility in your foot and ankle. Each one is practical, requires no special equipment, and can be done at home on your own schedule. We’ll also cover when exercises alone aren’t enough and it’s time to see a specialist.
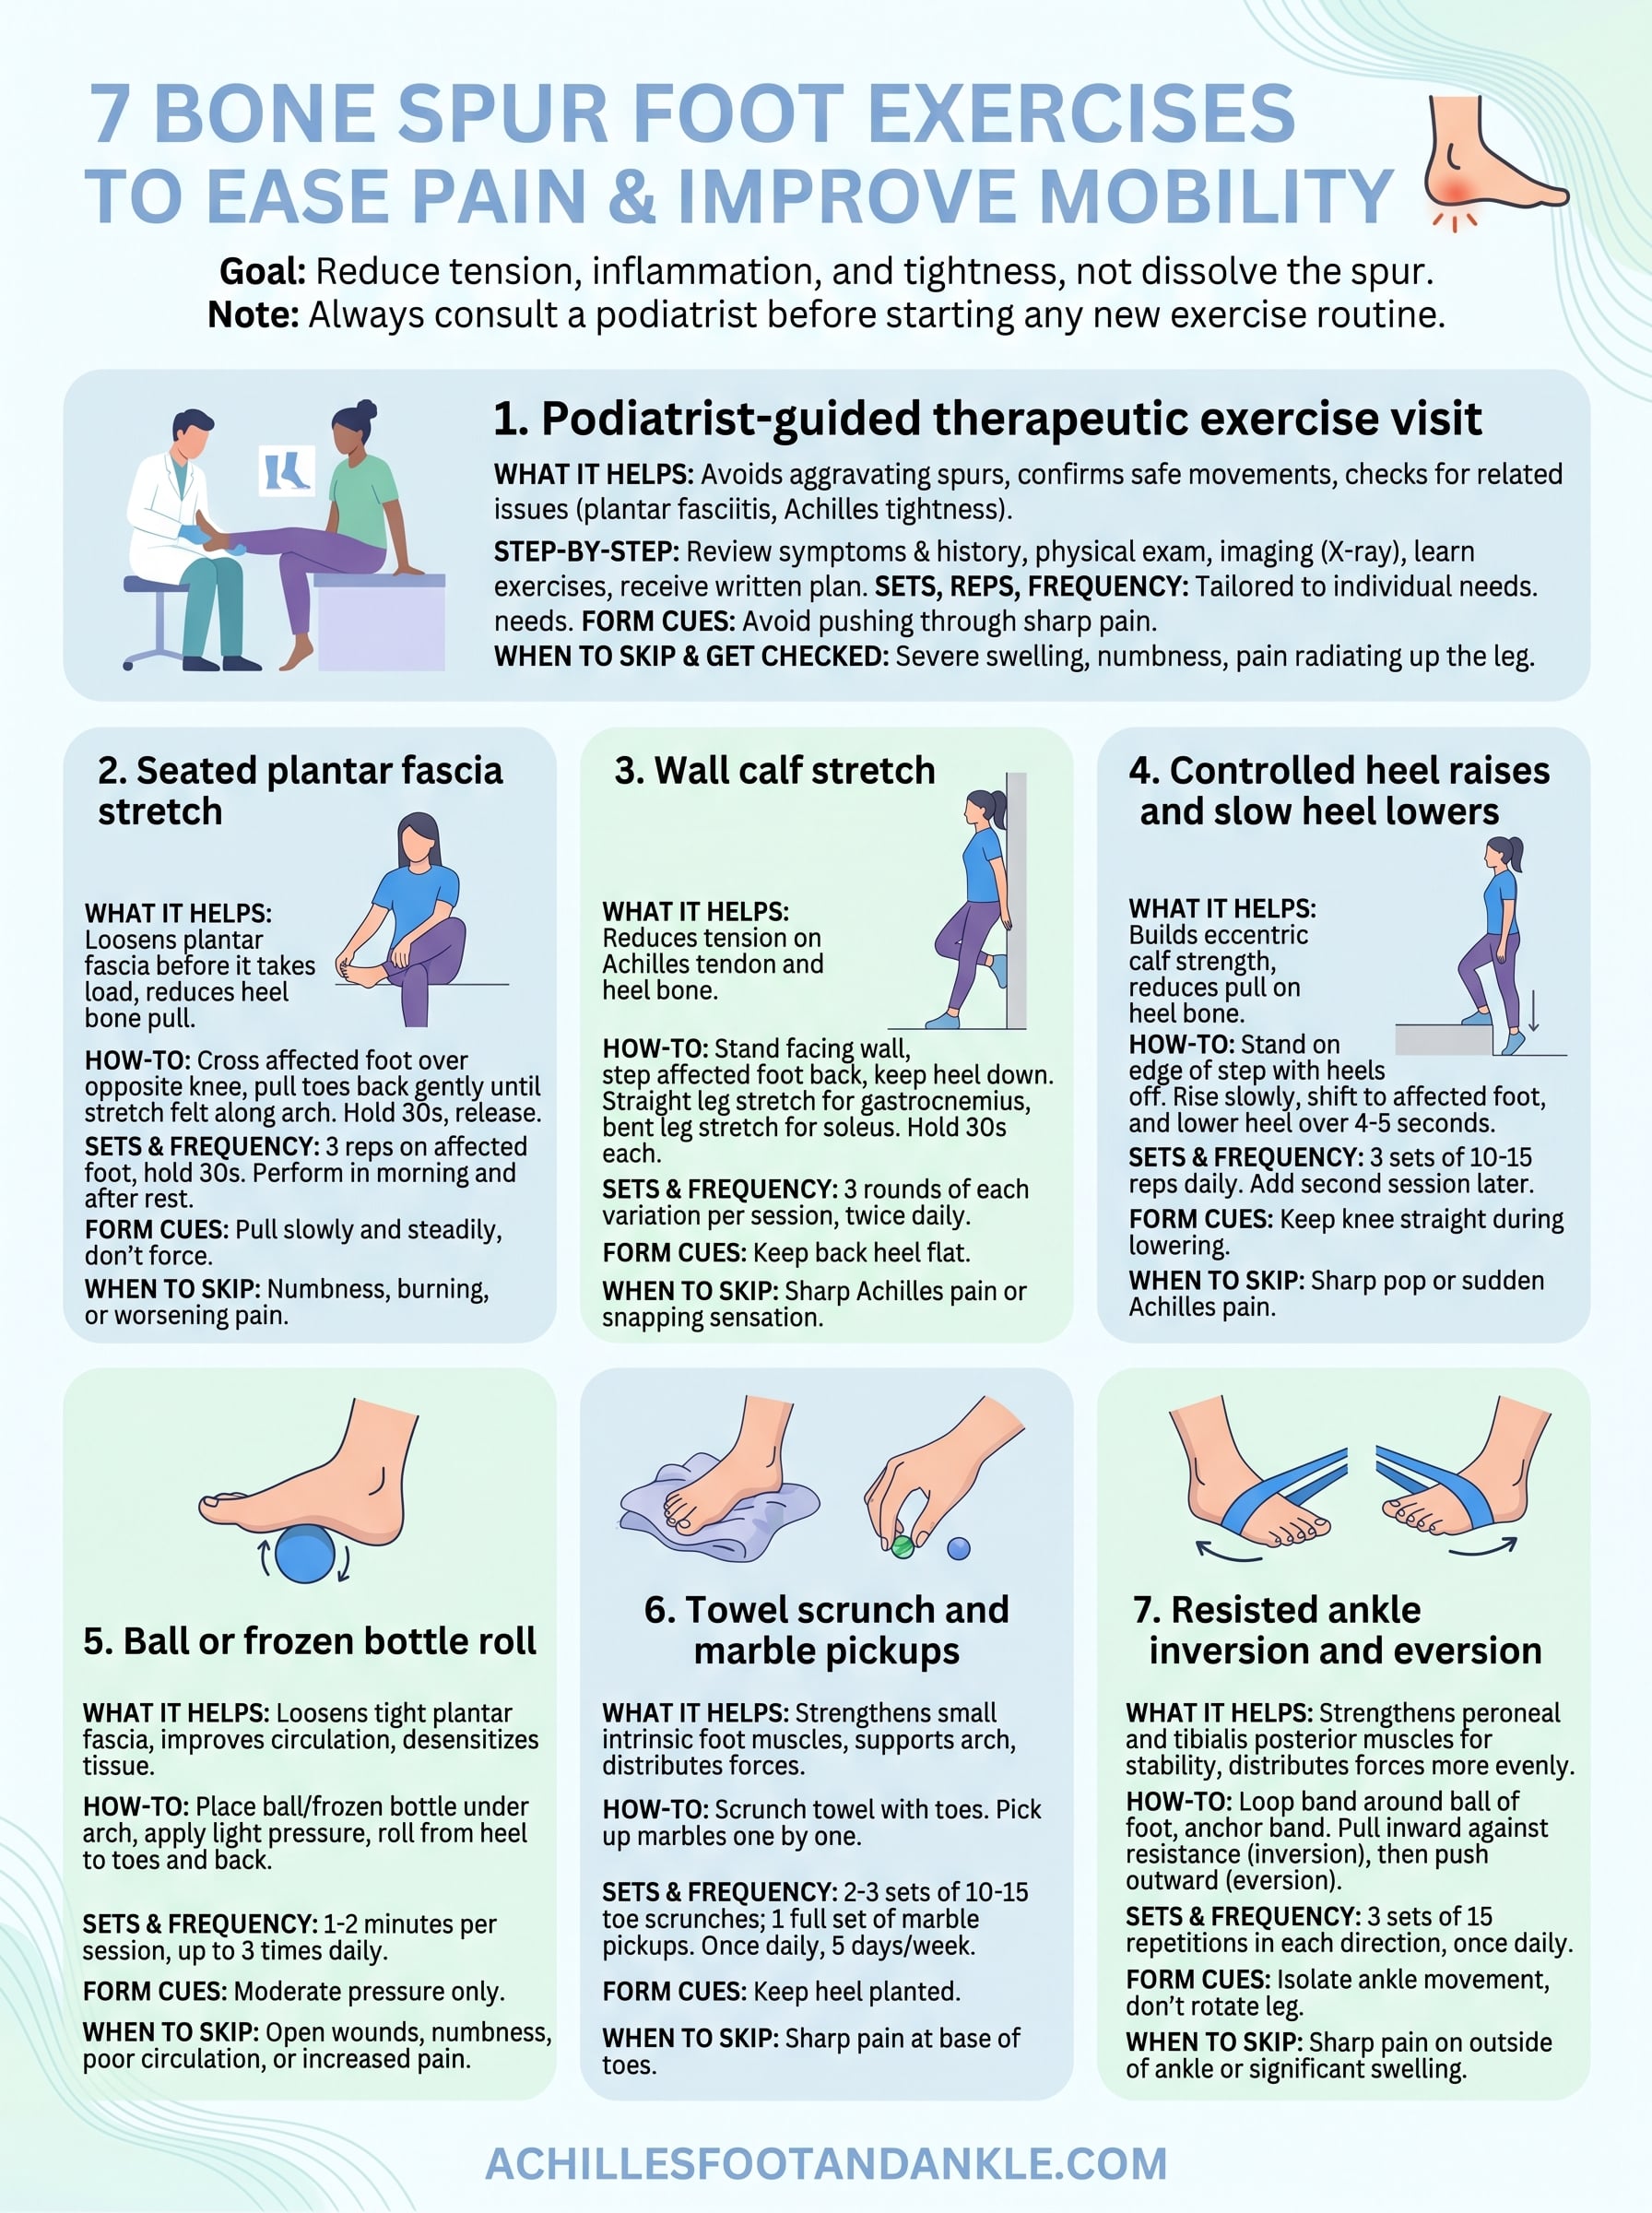
1. Podiatrist-guided therapeutic exercise visit
Before you start any bone spur foot exercises on your own, the single most valuable step you can take is scheduling at least one visit with a podiatrist for a personalized assessment. A trained specialist can confirm what type of spur you have, where it sits, and which movements are safe for your specific foot structure. Skipping this step means guessing, and guessing with foot pain routinely makes things worse.
What it helps
A podiatrist-guided visit helps you avoid exercises that could aggravate your spur while directing you toward the ones most likely to reduce your specific symptoms. Bone spurs on the heel behave differently than spurs on top of the foot or near a toe joint. Your provider will also check for related problems like plantar fasciitis or Achilles tendon tightness, which frequently accompany bone spurs and need to be addressed at the same time.
One evaluation visit can save you weeks of doing the wrong movements and put you on a faster path to real, lasting relief.
Step-by-step
Here’s what to expect during a therapeutic exercise consultation:
- Your podiatrist reviews your symptoms, pain location, and history, including how long you’ve had the issue and what makes it worse.
- They perform a physical exam, checking your range of motion, gait, and areas of tenderness.
- Imaging such as an X-ray confirms the exact location and size of the spur.
- Your provider demonstrates the exercises suited to your case and watches you perform them to check your form.
- You leave with a clear, written exercise plan so you know exactly what to do at home.
Sets, reps, and frequency
Your podiatrist will tailor the frequency and volume of your home program to your current pain level and mobility. Most patients begin with one to two short sessions per day, focusing on two to four targeted exercises rather than a long list. Recommendations often shift as your symptoms improve over time.
Form cues and common mistakes
The most common mistake is starting too aggressively, pushing through sharp pain or doing far more reps than recommended. Your provider will teach you to tell the difference between a mild stretching sensation and a real warning sign. Perform every movement slowly and with deliberate control, never bouncing or forcing range of motion.
When to skip and get checked
If you notice severe swelling, numbness, or pain radiating up your leg, do not begin any exercise program before seeing a provider. Those symptoms can indicate nerve involvement or a stress fracture, both of which require evaluation before you add any movement or load to the foot.
2. Seated plantar fascia stretch before your first steps
That first step out of bed is often the most painful one of the day for people dealing with heel spurs. The plantar fascia tightens overnight, and stepping down without warming it up first puts immediate stress on the tissue right next to the spur. This stretch addresses that directly by loosening the fascia before it takes any load.
What it helps
This stretch targets the plantar fascia, the thick band of tissue running along the bottom of your foot. Releasing tension in this structure reduces the pull on the heel bone where many spurs form, which is why it’s one of the most recommended bone spur foot exercises in clinical settings.
Step-by-step
- Sit on the edge of your bed or a chair with both feet flat on the floor.
- Cross your affected foot over your opposite knee.
- Grip your toes and gently pull them back toward your shin until you feel a stretch along the arch.
- Hold for 30 seconds, then slowly release.
Sets, reps, and frequency
Perform 3 repetitions on the affected foot, holding each for 30 seconds. Do this first thing in the morning before standing and again after long periods of rest.
This stretch consistently ranks as one of the most effective first steps for reducing morning heel pain associated with spurs and plantar fasciitis.
Form cues and common mistakes
Pull your toes back slowly and steadily, never forcing them into a sharp angle. Many people rush through this and miss the stretch entirely by not holding it long enough.
When to skip and get checked
Skip this stretch and contact a podiatrist if the bottom of your foot feels numb, burns, or the pain worsens with each session rather than improving after a few days.
3. Wall calf stretch for gastrocnemius and soleus
Tight calf muscles pull directly on your Achilles tendon and heel bone, increasing stress where heel spurs form. This stretch targets both the gastrocnemius (the larger upper calf) and the soleus (the deeper lower muscle), giving you relief along the entire posterior chain of your lower leg.

What it helps
Releasing your calf muscles reduces tension transmitted to your plantar fascia and heel, which means less compression around the spur site. Tight calves are one of the most overlooked drivers of heel spur pain, making this one of the most useful bone spur foot exercises for correcting that tightness systematically.
Step-by-step
Use a sturdy wall for support and move through each variation in sequence to stretch both calf muscles completely.
- Stand facing a wall with both hands flat against it at shoulder height.
- Step your affected foot back about two to three feet, keeping that heel on the ground.
- Keep your back leg straight and bend your front knee for the gastrocnemius stretch. Hold 30 seconds.
- Slightly bend your back knee to shift the stretch lower into the soleus. Hold another 30 seconds.
Sets, reps, and frequency
Perform 3 rounds of each variation on the affected side, stretching twice daily: once in the morning and once after prolonged sitting or standing.
Stretching both calf muscles as separate movements is more effective than treating them as one unit when managing heel spur discomfort.
Form cues and common mistakes
Keep your back heel flat on the floor throughout both variations. Letting the heel lift removes most of the benefit. Move slowly and never bounce or force the stretch past a comfortable range.
When to skip and get checked
Stop and contact a podiatrist if you feel sharp pain in your Achilles tendon or a snapping sensation in your calf during either position. Those signals suggest tendon stress that needs professional evaluation before you continue stretching.
4. Controlled heel raises and slow heel lowers on a step
Eccentric heel lowering is one of the more effective bone spur foot exercises for building the strength that protects your heel and Achilles tendon from ongoing stress. You perform this movement on the edge of a step, using gravity to create a controlled load through the calf, Achilles, and plantar fascia without putting sharp impact on the spur itself.
What it helps
This exercise builds eccentric calf strength, which reduces the pull on the heel bone during walking and standing. Stronger, more controlled calf tissue means less strain concentrates at the spur site with every step you take.
Step-by-step
- Stand on the edge of a step with both heels hanging off the back.
- Use a wall or railing for balance.
- Rise onto both toes slowly, taking two to three seconds on the way up.
- Shift your weight to the affected foot only and lower your heel below the step edge over four to five seconds.
- Return to both feet before repeating.
Sets, reps, and frequency
Perform 3 sets of 10 to 15 repetitions once daily. Add a second session after symptoms settle over the first two weeks.
Slowing down the lowering phase is where the real benefit happens, so never rush through it.
Form cues and common mistakes
Keep your knee straight throughout the lowering phase to target the gastrocnemius properly. Bending your knee shifts the load to the soleus, which changes the exercise entirely.
When to skip and get checked
Stop immediately if you feel a sharp pop or sudden Achilles pain during the movement and contact a podiatrist before resuming.
5. Ball or frozen bottle roll for the bottom of the foot
Rolling the bottom of your foot over a firm object loosens tight plantar fascia tissue and improves circulation in an area that rarely gets direct attention. You can use a lacrosse ball, tennis ball, or frozen water bottle depending on how much pressure and cold relief your symptoms call for.
What it helps
This technique applies gentle compression along the plantar fascia and the small muscles of your arch, releasing adhesions and reducing tightness around the spur site. Among bone spur foot exercises, rolling stands out because it also desensitizes irritated tissue, which makes each step feel less sharp over time.
Step-by-step
Keep the movement slow and deliberate throughout, pausing where you feel tightness rather than rushing past it.
- Sit in a chair with a ball or frozen bottle on the floor beneath your foot.
- Place the arch of your foot on the object and apply light downward pressure.
- Roll slowly from heel to toes and back, pausing on tender spots for five to ten seconds.
- Lift and reposition your foot as needed to cover the full arch.
Sets, reps, and frequency
Roll for one to two minutes on the affected foot per session. Repeat up to three times daily, particularly in the morning and after extended periods of standing.
A frozen bottle layers cold therapy on top of the mechanical release, making it especially useful at the end of a long day on your feet.
Form cues and common mistakes
Use moderate pressure only, never your full body weight. Pressing too hard bruises soft tissue instead of releasing it, which delays recovery rather than speeding it up.
When to skip and get checked
Avoid rolling if you have open wounds, numbness, or poor circulation in your foot. Contact a podiatrist if the technique consistently increases rather than reduces your pain after a few sessions.
6. Towel scrunch and marble pickups for foot strength
Most bone spur foot exercises focus on stretching, but the small muscles inside your foot need direct strengthening too. Weak intrinsic foot muscles shift more load onto the heel and arch with every step, which keeps pressure concentrated around the spur site. These two exercises rebuild that internal foot strength using items you already have at home.
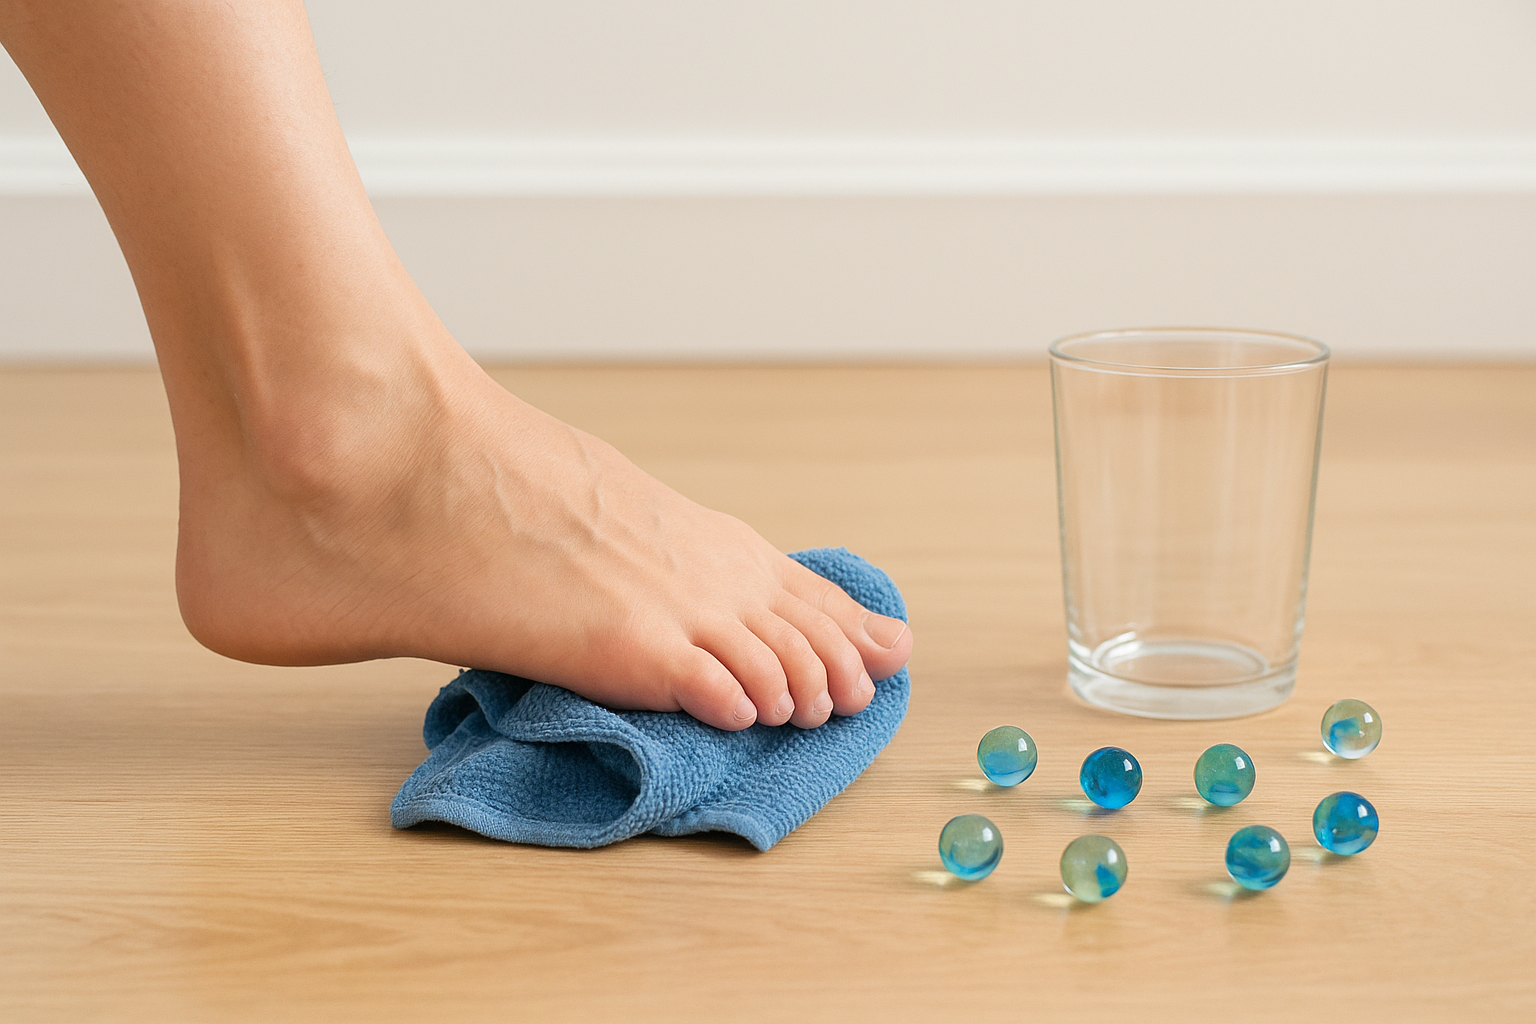
What it helps
Both movements train the small intrinsic muscles of your foot, which support your arch and distribute ground forces more evenly. Strengthening these muscles reduces the mechanical stress that accumulates at bone spur locations, making daily walking and standing significantly less painful over time.
Step-by-step
Complete both movements in the same seated session for maximum efficiency.
- Place a small towel flat on the floor and grip it with your toes, scrunching it toward your heel. Release and repeat.
- Scatter 10 to 15 marbles on the floor and pick them up one at a time using only your toes, dropping each into a cup.
Sets, reps, and frequency
Perform 2 to 3 sets of 10 to 15 toe scrunches per session. For marble pickups, complete one full set of all 15 marbles per session. Train once daily, five days per week.
Marble pickups challenge coordination and grip strength simultaneously, making them more demanding than they appear.
Form cues and common mistakes
Keep your heel planted firmly on the floor during both movements. Lifting your heel recruits your calf instead of your intrinsic foot muscles, which defeats the purpose of this exercise entirely.
When to skip and get checked
Skip these movements if gripping with your toes causes sharp joint pain at the base of your toes or along the top of your foot. That pattern can indicate a spur near a toe joint that needs imaging and direct evaluation before adding resistance.
7. Resisted ankle inversion and eversion for stability
Ankle instability puts uneven load on the heel and midfoot with every step, which means bone spurs absorb more stress than they should. Adding resistance band work to your bone spur foot exercises routine addresses this directly by training the muscles that control side-to-side ankle movement.
What it helps
This exercise strengthens the peroneal muscles on the outside of your ankle and the tibialis posterior on the inside, both of which stabilize your foot during walking and standing. Better ankle stability means force distributes more evenly across your foot rather than concentrating at the spur site.
Step-by-step
You need a light resistance band looped around a fixed object for both movements.
- Sit in a chair with your foot slightly raised off the floor.
- Loop the band around the ball of your affected foot.
- For inversion, anchor the band to the outside and pull your foot inward against the resistance, then slowly return.
- For eversion, anchor the band to the inside and push your foot outward, then slowly return.
Sets, reps, and frequency
Perform 3 sets of 15 repetitions in each direction, once daily.
Controlling the return phase of each rep builds more stability than the movement itself.
Form cues and common mistakes
Keep your ankle moving, not your whole leg. Many people rotate at the hip instead of isolating the ankle, which eliminates the benefit of the exercise.
When to skip and get checked
Stop and contact a podiatrist if you feel sharp pain along the outside of your ankle or notice significant swelling after sessions.
Next steps for lasting relief
These seven bone spur foot exercises give you a solid starting point, but consistency and proper guidance are what turn short-term relief into lasting improvement. Commit to your routine daily, pay attention to how your foot responds, and track which movements reduce your pain versus which ones seem to stir it up. That feedback tells you and your provider a lot about what your foot needs next.
If your symptoms persist beyond a few weeks, worsen, or keep coming back after exercise sessions, those are signals that something deeper needs attention. A podiatrist can evaluate whether you need custom orthotics, targeted injections, or other treatments alongside your home program. The exercises support your recovery, but they work best as part of a broader care plan tailored specifically to your foot. Book a same-day appointment at Achilles Foot and Ankle Center and get a clear, personalized plan for your foot pain today.